📌 컨테이너를 학습하고 3 tier로 운영환경을 구성해봅니다.
개발 환경을 구성해보고 지속적 통합을 경험해봅니다.
1. Reverse Proxy 구성하기
A. 도커 설치
$ sudo apt-get update && \
sudo apt-get install -y apt-transport-https ca-certificates curl software-properties-common && \
curl -fsSL https://download.docker.com/linux/ubuntu/gpg | sudo apt-key add - && \
sudo apt-key fingerprint 0EBFCD88 && \
sudo add-apt-repository "deb [arch=amd64] https://download.docker.com/linux/ubuntu $(lsb_release -cs) stable" && \
sudo apt-get update && \
sudo apt-get install -y docker-ce && \
sudo usermod -aG docker ubuntu && \
sudo curl -L "https://github.com/docker/compose/releases/download/1.23.2/docker-compose-$(uname -s)-$(uname -m)" -o /usr/local/bin/docker-compose && \
sudo chmod +x /usr/local/bin/docker-compose && \
sudo ln -s /usr/local/bin/docker-compose /usr/bin/docker-compose
도커 컨테이너가 처음인 분들은 강의 영상 확인 후, 포스팅을 참고바랍니다.
B. 컨테이너 실행
Dockerfile
FROM nginx

COPY nginx.conf /etc/nginx/nginx.conf
nginx.conf
events {}

http {
  upstream app {
    server 172.17.0.1:8080;
  }

  server {
    listen 80;

    location / {
      proxy_pass http://app;
    }
  }
}
실행
$ docker build -t brainbackdoor/reverse-proxy .
$ docker run -d -p 80:80 brainbackdoor/reverse-proxy
$ curl http://localhost
2. TLS 설정
서버의 보안과 별개로 서버와 클라이언트간 통신상의 암호화가 필요합니다. 평문으로 통신할 경우, 패킷을 스니핑할 수 있기 때문입니다.
letsencrypt를 활용하여 무료로 TLS 인증서를 사용할 수 있어요.
$ docker run -it --rm --name certbot \
  -v '/etc/letsencrypt:/etc/letsencrypt' \
  -v '/var/lib/letsencrypt:/var/lib/letsencrypt' \
  certbot/certbot certonly -d 'yourdomain.com' --manual --preferred-challenges dns --server https://acme-v02.api.letsencrypt.org/directory
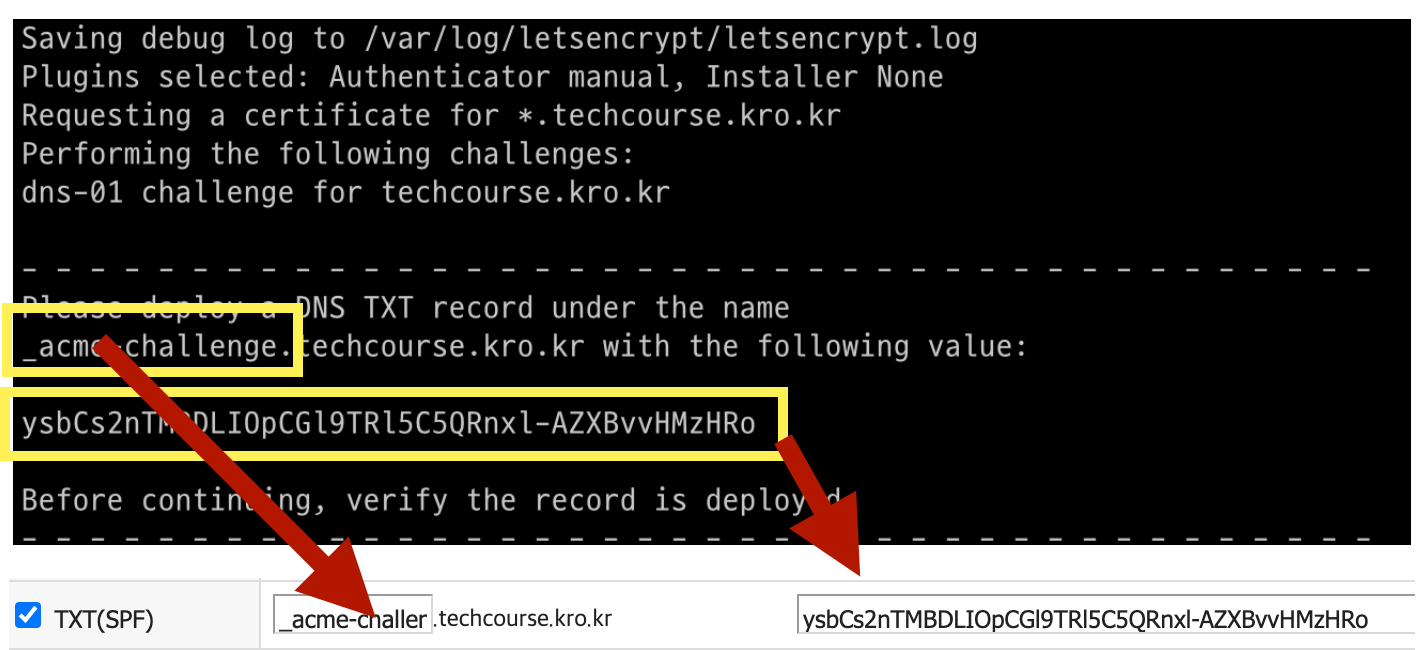
인증서 생성 후 유효한 URL인지 확인을 위해 DNS TXT 레코드로 추가합니다.
DNS를 설정하는 사이트에서 DNS TXT 레코드를 추가한 후, 제대로 반영되었는지 dig 명령어로 확인한 후에 인증서 설정 진행을 계속합니다.
$ dig -t txt _acme-challenge.example.com +short생성한 인증서를 활용하여 Reverse Proxy에 TLS 설정을 해봅시다. 우선 인증서를 Dockerfile이 있는 현재 경로로 옮깁니다.
$ cp /etc/letsencrypt/live/[도메인주소]/fullchain.pem ./
$ cp /etc/letsencrypt/live/[도메인주소]/privkey.pem ./
Dockerfile 을 아래와 같이 수정합니다.
FROM nginx

COPY nginx.conf /etc/nginx/nginx.conf
COPY fullchain.pem /etc/letsencrypt/live/[도메인주소]/fullchain.pem
COPY privkey.pem /etc/letsencrypt/live/[도메인주소]/privkey.pem
nginx.conf 파일을 아래와 같이 수정합니다.
events {}

http {
  upstream app {
    server 172.17.0.1:8080;
  }

  # Redirect all traffic to HTTPS
  server {
    listen 80;
    return 301 https://$host$request_uri;
  }

  server {
    listen 443 ssl;
    ssl_certificate /etc/letsencrypt/live/[도메인주소]/fullchain.pem;
    ssl_certificate_key /etc/letsencrypt/live/[도메인주소]/privkey.pem;

    # Disable SSL
    ssl_protocols TLSv1 TLSv1.1 TLSv1.2;

    # 통신과정에서 사용할 암호화 알고리즘
    ssl_prefer_server_ciphers on;
    ssl_ciphers ECDH+AESGCM:ECDH+AES256:ECDH+AES128:DH+3DES:!ADH:!AECDH:!MD5;

    # Enable HSTS
    # client의 browser에게 http로 어떠한 것도 load 하지 말라고 규제합니다.
    # 이를 통해 http에서 https로 redirect 되는 request를 minimize 할 수 있습니다.
    add_header Strict-Transport-Security "max-age=31536000" always;

    # SSL sessions
    ssl_session_cache shared:SSL:10m;
    ssl_session_timeout 10m;

    location / {
      proxy_pass http://app;
    }
  }
}
방금전에 띄웠던 도커 컨테이너를 중지 & 삭제하고 새로운 설정을 반영하여 다시 띄워봅시다.
$ docker stop proxy && docker rm proxy
$ docker build -t brainbackdoor/reverse-proxy:0.0.2 .
$ docker run -d -p 80:80 -p 443:443 --name proxy brainbackdoor/reverse-proxy:0.0.2
3. 운영 데이터베이스 구성하기
일반적으로, 실제 운영환경에서 컨테이너로 데이터베이스의 영속성 데이터를 다루지 않습니다. 컨테이너의 철학과 데이터베이스의 영속성은 다소 배치되는 부분이 있다고 생각합니다. 여기서는 원활한 실습을 위해 제가 미리 push해둔 컨테이너를 활용합니다.
# id: root, pw: masterpw
$ docker run -d -p 3306:3306 brainbackdoor/data-subway:0.0.1
4. 설정 파일 나누기
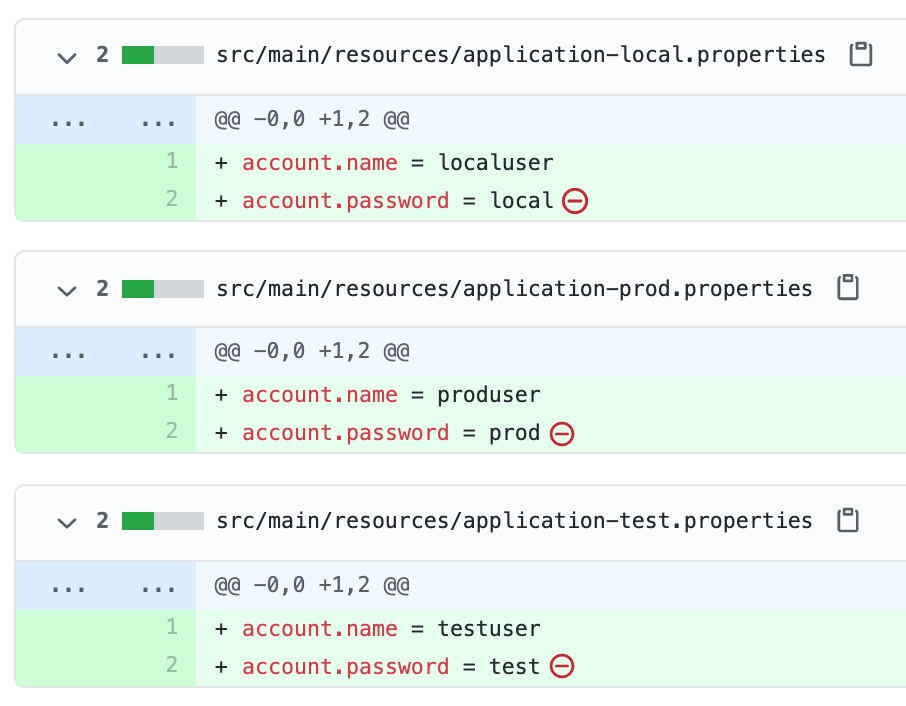
실제로 배포를 하려다보면, JUnit을 활용한 test 단계와 local 환경에서 직접 애플리케이션을 확인할 때, 그리고 실제로 배포할 때 등 각 상황에 맞춰 설정을 다르게 적용할 필요성이 생깁니다.
-Dspring.profiles.active=prod 옵션을 추가하여 실행하면
application-prod.properties의 설정을 사용합니다.$ java -jar -Dspring.profiles.active=prod [jar파일명]
5. 배포 스크립트 작성해보기
반복적으로 사용하는 명령어를 Script로 작성해봅니다.
#!/bin/bash

## 변수 설정

txtrst='\033[1;37m' # White
txtred='\033[1;31m' # Red
txtylw='\033[1;33m' # Yellow
txtpur='\033[1;35m' # Purple
txtgrn='\033[1;32m' # Green
txtgra='\033[1;30m' # Gray


echo -e "${txtylw}=======================================${txtrst}"
echo -e "${txtgrn}  << 스크립트 🧐 >>${txtrst}"
echo -e "${txtylw}=======================================${txtrst}"

## 저장소 pull
## gradle build
## 프로세스 pid를 찾는 명령어
## 프로세스를 종료하는 명령어
## ...
기능 단위로 함수로 만들어봅니다.
function pull() {
  echo -e ""
  echo -e ">> Pull Request 🏃♂️ "
  git pull origin master
}

pull;
스크립트 실행시 파라미터를 전달해봅니다.
실행시 파라미터를 전달하도록 하여 범용성 있는 스크립트를 작성해봅니다.
read 명령어를 활용하여 사용자의 Y/N 답변을 받도록 할 수도 있어요.
#!/bin/bash

## ...

EXECUTION_PATH=$(pwd)
SHELL_SCRIPT_PATH=$(dirname $0)
BRANCH=$1
PROFILE=$2

## 조건 설정
if [[ $# -ne 2 ]]
then
    echo -e "${txtylw}=======================================${txtrst}"
    echo -e "${txtgrn}  << 스크립트 🧐 >>${txtrst}"
    echo -e ""
    echo -e "${txtgrn} $0 브랜치이름 ${txtred}{ prod | dev }"
    echo -e "${txtylw}=======================================${txtrst}"
    exit
fi

## ...
반복적으로 동작하는 스크립트를 작성해봅니다.
github branch 변경이 있는 경우에 스크립트가 동작하도록 작성해봅니다.
function check_df() {
  git fetch
  master=$(git rev-parse $BRANCH)
  remote=$(git rev-parse origin/$BRANCH)

  if [[ $master == $remote ]]; then
    echo -e "[$(date)] Nothing to do!!! 😫"
    exit 1
  fi
}
crontab을 활용해봅니다.
매 10분마다 동작하도록한 후 log를 확인해보세요.
crontab과 /etc/crontab의 차이에 대해 학습해봅니다.
6. 추가로 진행해볼만한 작업들
A. 설정 별도로 관리하기
우선, github private 저장소를 생성한 후 application.properties 등의 설정 파일을 올립니다.
git의 서브모듈 기능을 활용하여 특정 경로에 private repository를 참조하도록 설정합니다
이후에 소스코드를 받을 때는 서브모듈까지 clone해야 합니다.
$ git submodule add [자신의 private 저장소] ./src/main/resources/config
$ git clone --recurse-submodules [자신의 프로젝트 저장소]
설정 파일의 내용이 변경된 경우
$ git submodule foreach git pull origin main
$ git submodule foreach git add .
$ git submodule foreach git commit -m "commit message"
$ git submodule foreach git push origin main
B. 로컬 테스트시 MultiRun 활용
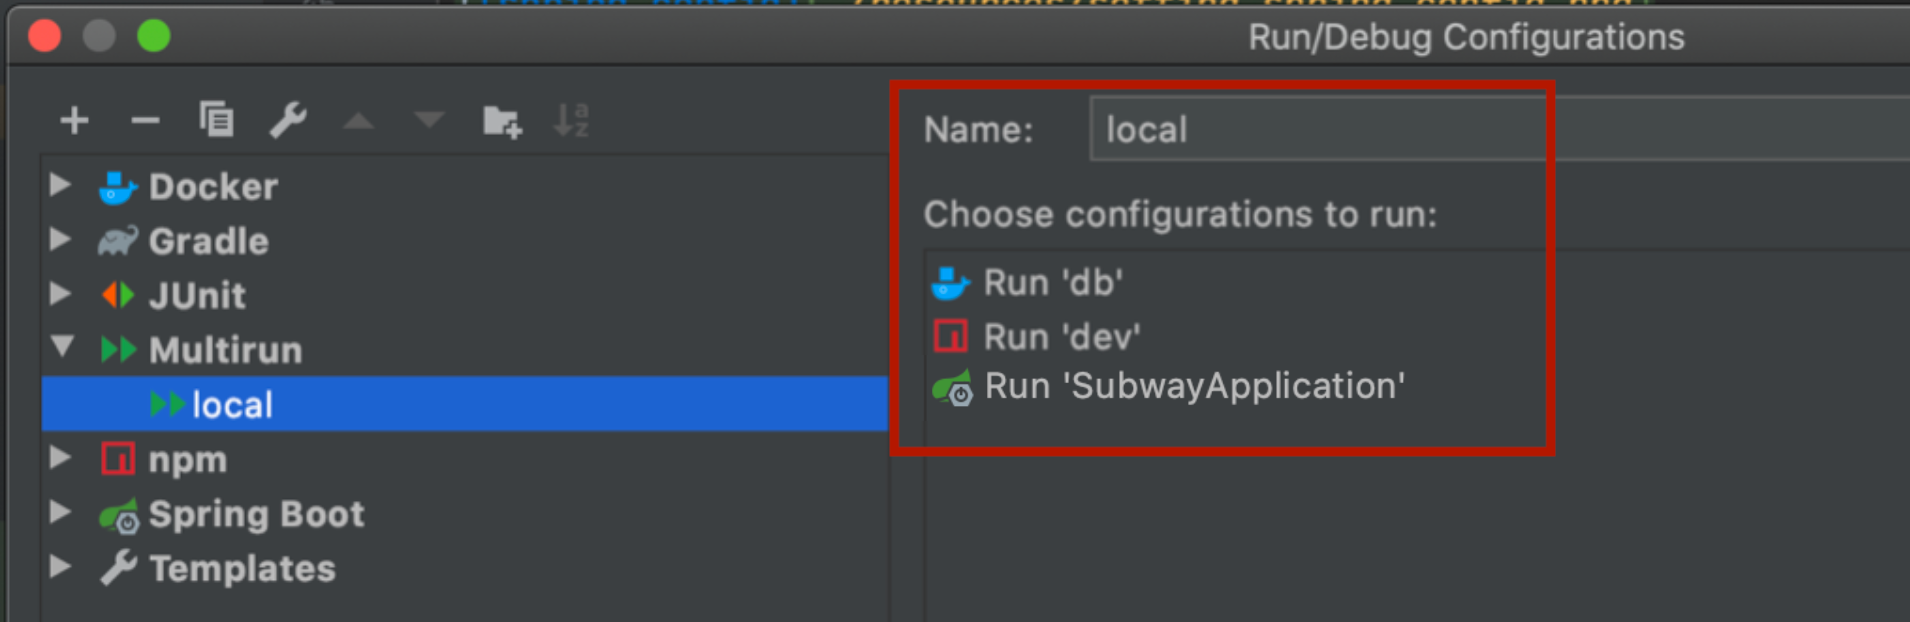
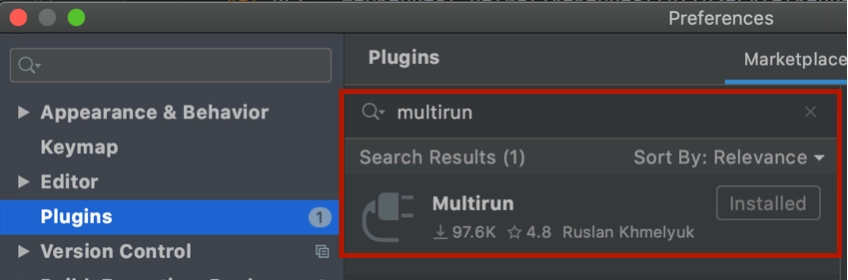
로컬에서 서버를 띄울 때, IntelliJ의 Multirun 플러그인을 활용하면 보다 손 쉽게 서버를 띄울 수 있습니다.
Multi Run 플러그인 설치
Multi Run 설정
IntelliJ -> Run -> Edit Configurations...
Docker 설정

NPM 설정

Multi Run 설정